Restoring double-hung windows involves repairing or replacing damaged parts and ensuring smooth operation. This process preserves the window's historical value.
Double-hung windows are a classic feature in many older homes, offering charm and functionality. Over time, these windows may show signs of wear, such as broken sash cords, rotting wood, or draft issues. Restoration helps maintain their aesthetic appeal while improving energy efficiency.
Start by assessing the condition of the window and identifying any damaged components. Repair or replace these parts to restore the window's functionality. Restoring double-hung windows is an eco-friendly alternative to full window replacement, preserving the architectural integrity of your home while enhancing its value.
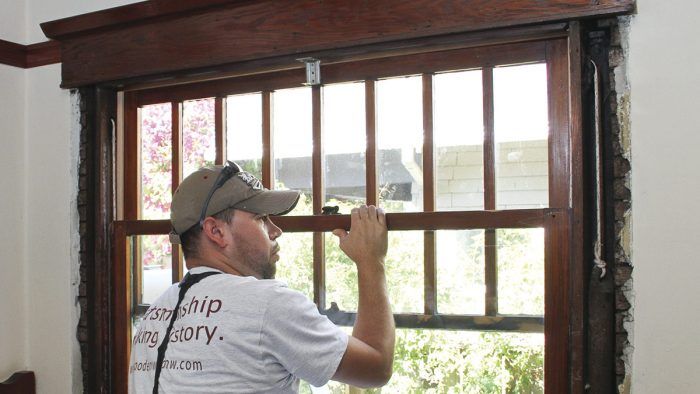
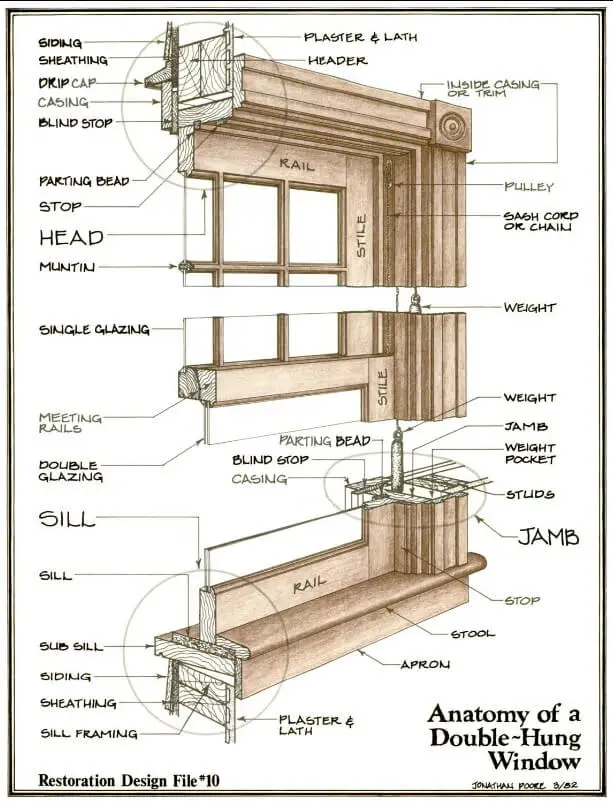
Credit: www.finehomebuilding.com
Tools And Materials
Restoring double-hung windows can be a rewarding project. You need the right tools and materials for the job. This section will guide you through the essentials.
Essential Tools
Having the right tools makes the job easier. Here are the essential tools you need:
- Screwdrivers: Phillips and flat-head screwdrivers for removing screws.
- Pry Bar: Useful for removing old sashes and trim.
- Putty Knife: For applying and smoothing putty.
- Utility Knife: For cutting old paint or caulk.
- Hammer: For tapping nails into place.
- Chisel: Helpful for removing stubborn materials.
- Measuring Tape: Ensures accurate measurements.
- Paintbrush: For applying primer and paint.
Required Materials
Gather these materials before starting your window restoration:
| Material | Purpose |
|---|---|
| Wood Filler | Fills gaps and cracks in the wood. |
| Glazing Putty | Secures glass panes in place. |
| Replacement Glass | Replaces broken or cracked panes. |
| Sandpaper | Smooths the wood surface. |
| Primer | Prepares the wood for painting. |
| Paint | Provides a fresh finish. |
| Nails and Screws | Secures the window parts together. |
| Weatherstripping | Improves insulation and seals gaps. |
Preparation
Restoring double-hung windows can be a rewarding project. Proper preparation ensures safety and efficiency. Here, we’ll cover essential steps for a successful restoration.
Safety Precautions
- Wear safety goggles to protect your eyes from debris.
- Use work gloves to shield your hands.
- Ensure you have a first aid kit nearby.
- Check the stability of your ladder before using it.
Workspace Setup
A well-organized workspace makes the task easier. Follow these tips for setting up your area:
- Choose a clean, flat surface to work on.
- Ensure adequate lighting for detailed tasks.
- Keep your tools and materials within reach.
Consider using a table to organize your tools:
| Tool | Purpose |
|---|---|
| Screwdriver | Remove screws |
| Pry bar | Lift window sash |
| Putty knife | Scrape old paint |
By following these steps, you’ll create a safe and efficient workspace. This ensures your double-hung window restoration goes smoothly.
Removing The Windows
Restoring double-hung windows starts with removing them safely. This step is crucial for a successful restoration. Follow these instructions to remove your windows without damage.
Loosening The Stops
The stops are small wooden strips. They hold the sashes in place. Use a putty knife or small pry bar to loosen them. Be gentle to avoid breaking the stops. Carefully slide the tool under the stop. Wiggle it to loosen the nails or screws.
| Tool | Purpose |
|---|---|
| Putty Knife | Loosen stops |
| Pry Bar | Remove nails |
Detaching The Sashes
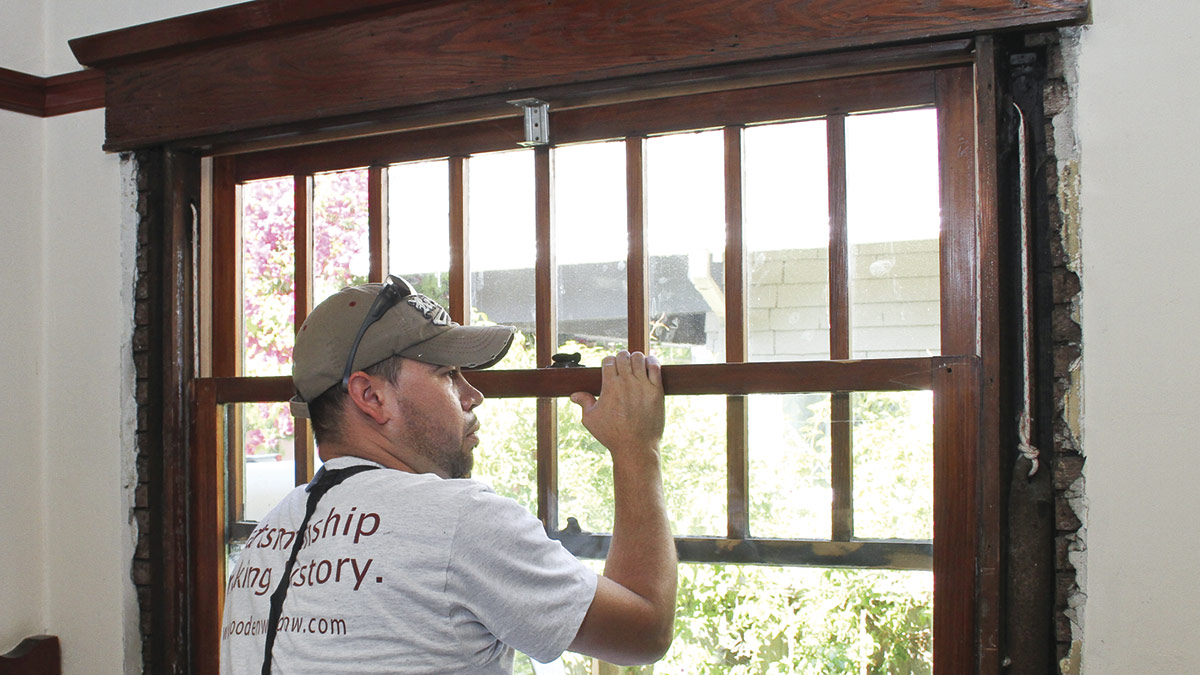
The sashes are the moving parts of the window. To remove them, lift the bottom sash first. Tilt it inward and pull it out. Next, repeat with the top sash.
- Lift the bottom sash.
- Tilt it inward.
- Pull it out.
- Repeat with the top sash.
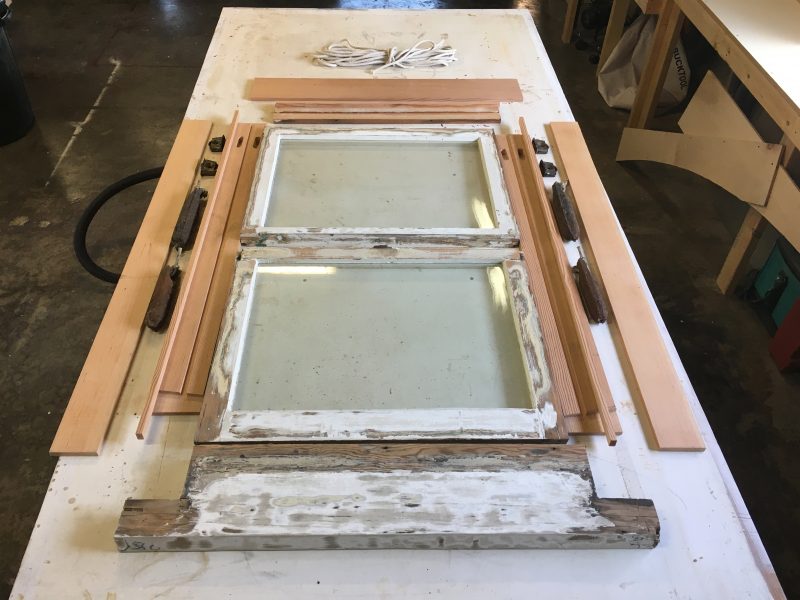
Place the sashes on a flat surface. This prevents damage while you work on them.
Credit: www.finehomebuilding.com
Cleaning And Inspecting
Restoring double-hung windows starts with cleaning and inspecting. This step is crucial. It helps you identify any issues. By cleaning thoroughly, you can see the true condition of your windows. Inspection lets you catch problems early. Below, we'll cover how to remove old paint and check for damage.
Removing Old Paint
Old paint can hide damage. It also makes windows look bad. Follow these steps to remove it:
- Use a scraper to remove loose paint.
- Apply paint remover with a brush.
- Let it sit for the time specified on the product.
- Scrape off the softened paint.
- Sand the surface for a smooth finish.
Always wear protective gear. This includes gloves and goggles. Use a mask if working indoors.
Checking For Damage
After removing the paint, inspect the window. Look for signs of damage:
- Cracks in the wood
- Soft or rotten wood
- Loose joints
- Broken glass
Use a flashlight to see better. Check the window frame and sash. If you find any damage, make a note. You'll need to fix these issues before painting.
| Damage Type | What to Look For | Action Needed |
|---|---|---|
| Cracks | Visible splits in the wood | Fill with wood filler |
| Soft Wood | Spongy texture | Replace the affected part |
| Loose Joints | Gaps at joints | Re-glue and clamp |
| Broken Glass | Cracked or shattered glass | Replace the glass pane |
Identifying these issues early makes restoration easier. It also ensures your windows will function well.
Repairing The Sashes
Double-hung windows offer timeless appeal and functionality. Over time, sashes can wear out. Repairing them ensures your windows work well and look great. Let's explore how to fix cracks and replace glass panes in sashes.
Fixing Cracks
Cracks in window sashes can let in drafts and moisture. Repairing them is simple and effective.
- Clean the Cracks: Use a small brush to remove dirt.
- Apply Wood Filler: Fill the cracks with wood filler. Let it dry.
- Sand Smooth: Once dry, sand the filler until smooth.
- Paint or Stain: Match the sash color by painting or staining.
Fixing cracks can make your window sashes last longer.
Replacing Glass Panes
If a glass pane breaks, replacing it is crucial. Follow these steps:
| Step | Description |
|---|---|
| 1 | Remove Broken Glass: Wear gloves. Carefully remove all glass pieces. |
| 2 | Clean the Frame: Clear debris and old putty from the frame. |
| 3 | Measure New Glass: Measure the frame and cut new glass to fit. |
| 4 | Install New Glass: Place the glass in the frame. Secure with new putty. |
| 5 | Seal and Smooth: Smooth the putty for a clean look. |
Replacing glass panes keeps your windows functional and secure.
Reassembling The Windows
Restoring double-hung windows brings them back to life. After cleaning and repairing, it's time to reassemble. This step ensures your windows work smoothly and look great. Follow these steps to reassemble your double-hung windows.
Reinstalling The Sashes
Begin by reinstalling the sashes. These are the moving parts of the window.
- First, place the bottom sash into the window frame.
- Next, tilt the sash to fit it into the side tracks.
- Check that the sash moves up and down smoothly.
- Repeat the process for the top sash.
Ensure both sashes are secure and move freely. Properly installed sashes enhance window function and appearance.
Securing The Stops
Next, focus on securing the stops. Stops keep the sashes in place.
- Align the stops with the edges of the window frame.
- Nail or screw the stops into position carefully.
- Ensure the stops are flush with the frame.
- Check that the sashes move without hindrance.
Securing the stops ensures the window operates correctly. Properly installed stops prevent the sashes from rattling or falling out.
| Step | Description |
|---|---|
| Reinstalling Sashes | Place, tilt, fit, and check the sashes |
| Securing Stops | Align, nail, ensure flush, check movement |
Reassembling double-hung windows might take time, but it's worthwhile. Your windows will look new and work perfectly.
Final Touches
Restoring double-hung windows involves detailed steps. The final touches ensure durability and functionality. This includes applying weatherstripping and finishing with paint.
Applying Weatherstripping
Weatherstripping seals gaps around the window. This keeps out drafts and saves energy. Follow these steps to apply weatherstripping:
- Clean the Surfaces: Use a damp cloth to remove dust.
- Measure the Edges: Measure the window edges accurately.
- Cut the Strips: Cut weatherstripping to the measured lengths.
- Apply the Strips: Peel off the backing and press firmly.
Types of weatherstripping include:
- V-strip
- Foam Tape
- Felt
- Door Sweeps
Finishing With Paint
Painting protects the wood and enhances the window's look. Follow these steps for a smooth finish:
- Sand the Surface: Lightly sand the wood for smoothness.
- Apply Primer: Use a primer to seal the wood.
- Paint the Window: Apply paint evenly using a brush.
- Let it Dry: Allow the paint to dry completely.
Choose paint that suits your window and weather conditions. Oil-based paint is durable. Water-based paint is eco-friendly.
Credit: builttowithstand.com
Frequently Asked Questions
Can You Repair Double-hung Windows?
Yes, we can repair double-hung windows. Our skilled technicians handle sash, frame, and hardware repairs efficiently. Contact us today!
How Do You Fix A Double Hung Window That Slides Down?
To fix a double hung window that slides down, replace the sash cords or balance springs. Check for broken parts and lubricate the tracks. Ensure the window is correctly aligned and secure any loose components.
How To Reseal Double-hung Windows?
To reseal double-hung windows, clean the area, apply weatherstripping tape, and seal gaps with caulk. Ensure proper alignment.
How Do You Put A Double Hung Window Back In?
To reinstall a double hung window, first, tilt the window sashes inward. Align the sash pivots with the frame tracks. Tilt the sashes back into place. Ensure both sashes lock securely. Check for proper operation and balance.
How To Identify Double-hung Windows?
Double-hung windows have two sashes that slide vertically, allowing both top and bottom parts to open.
Conclusion
Restoring double-hung windows can rejuvenate your home's charm and efficiency. The process requires patience but offers rewarding results. By following proper steps, you ensure longevity and beauty for your windows. Invest time in restoration to enhance both aesthetics and functionality.
Your efforts will pay off with a more comfortable, energy-efficient home.

